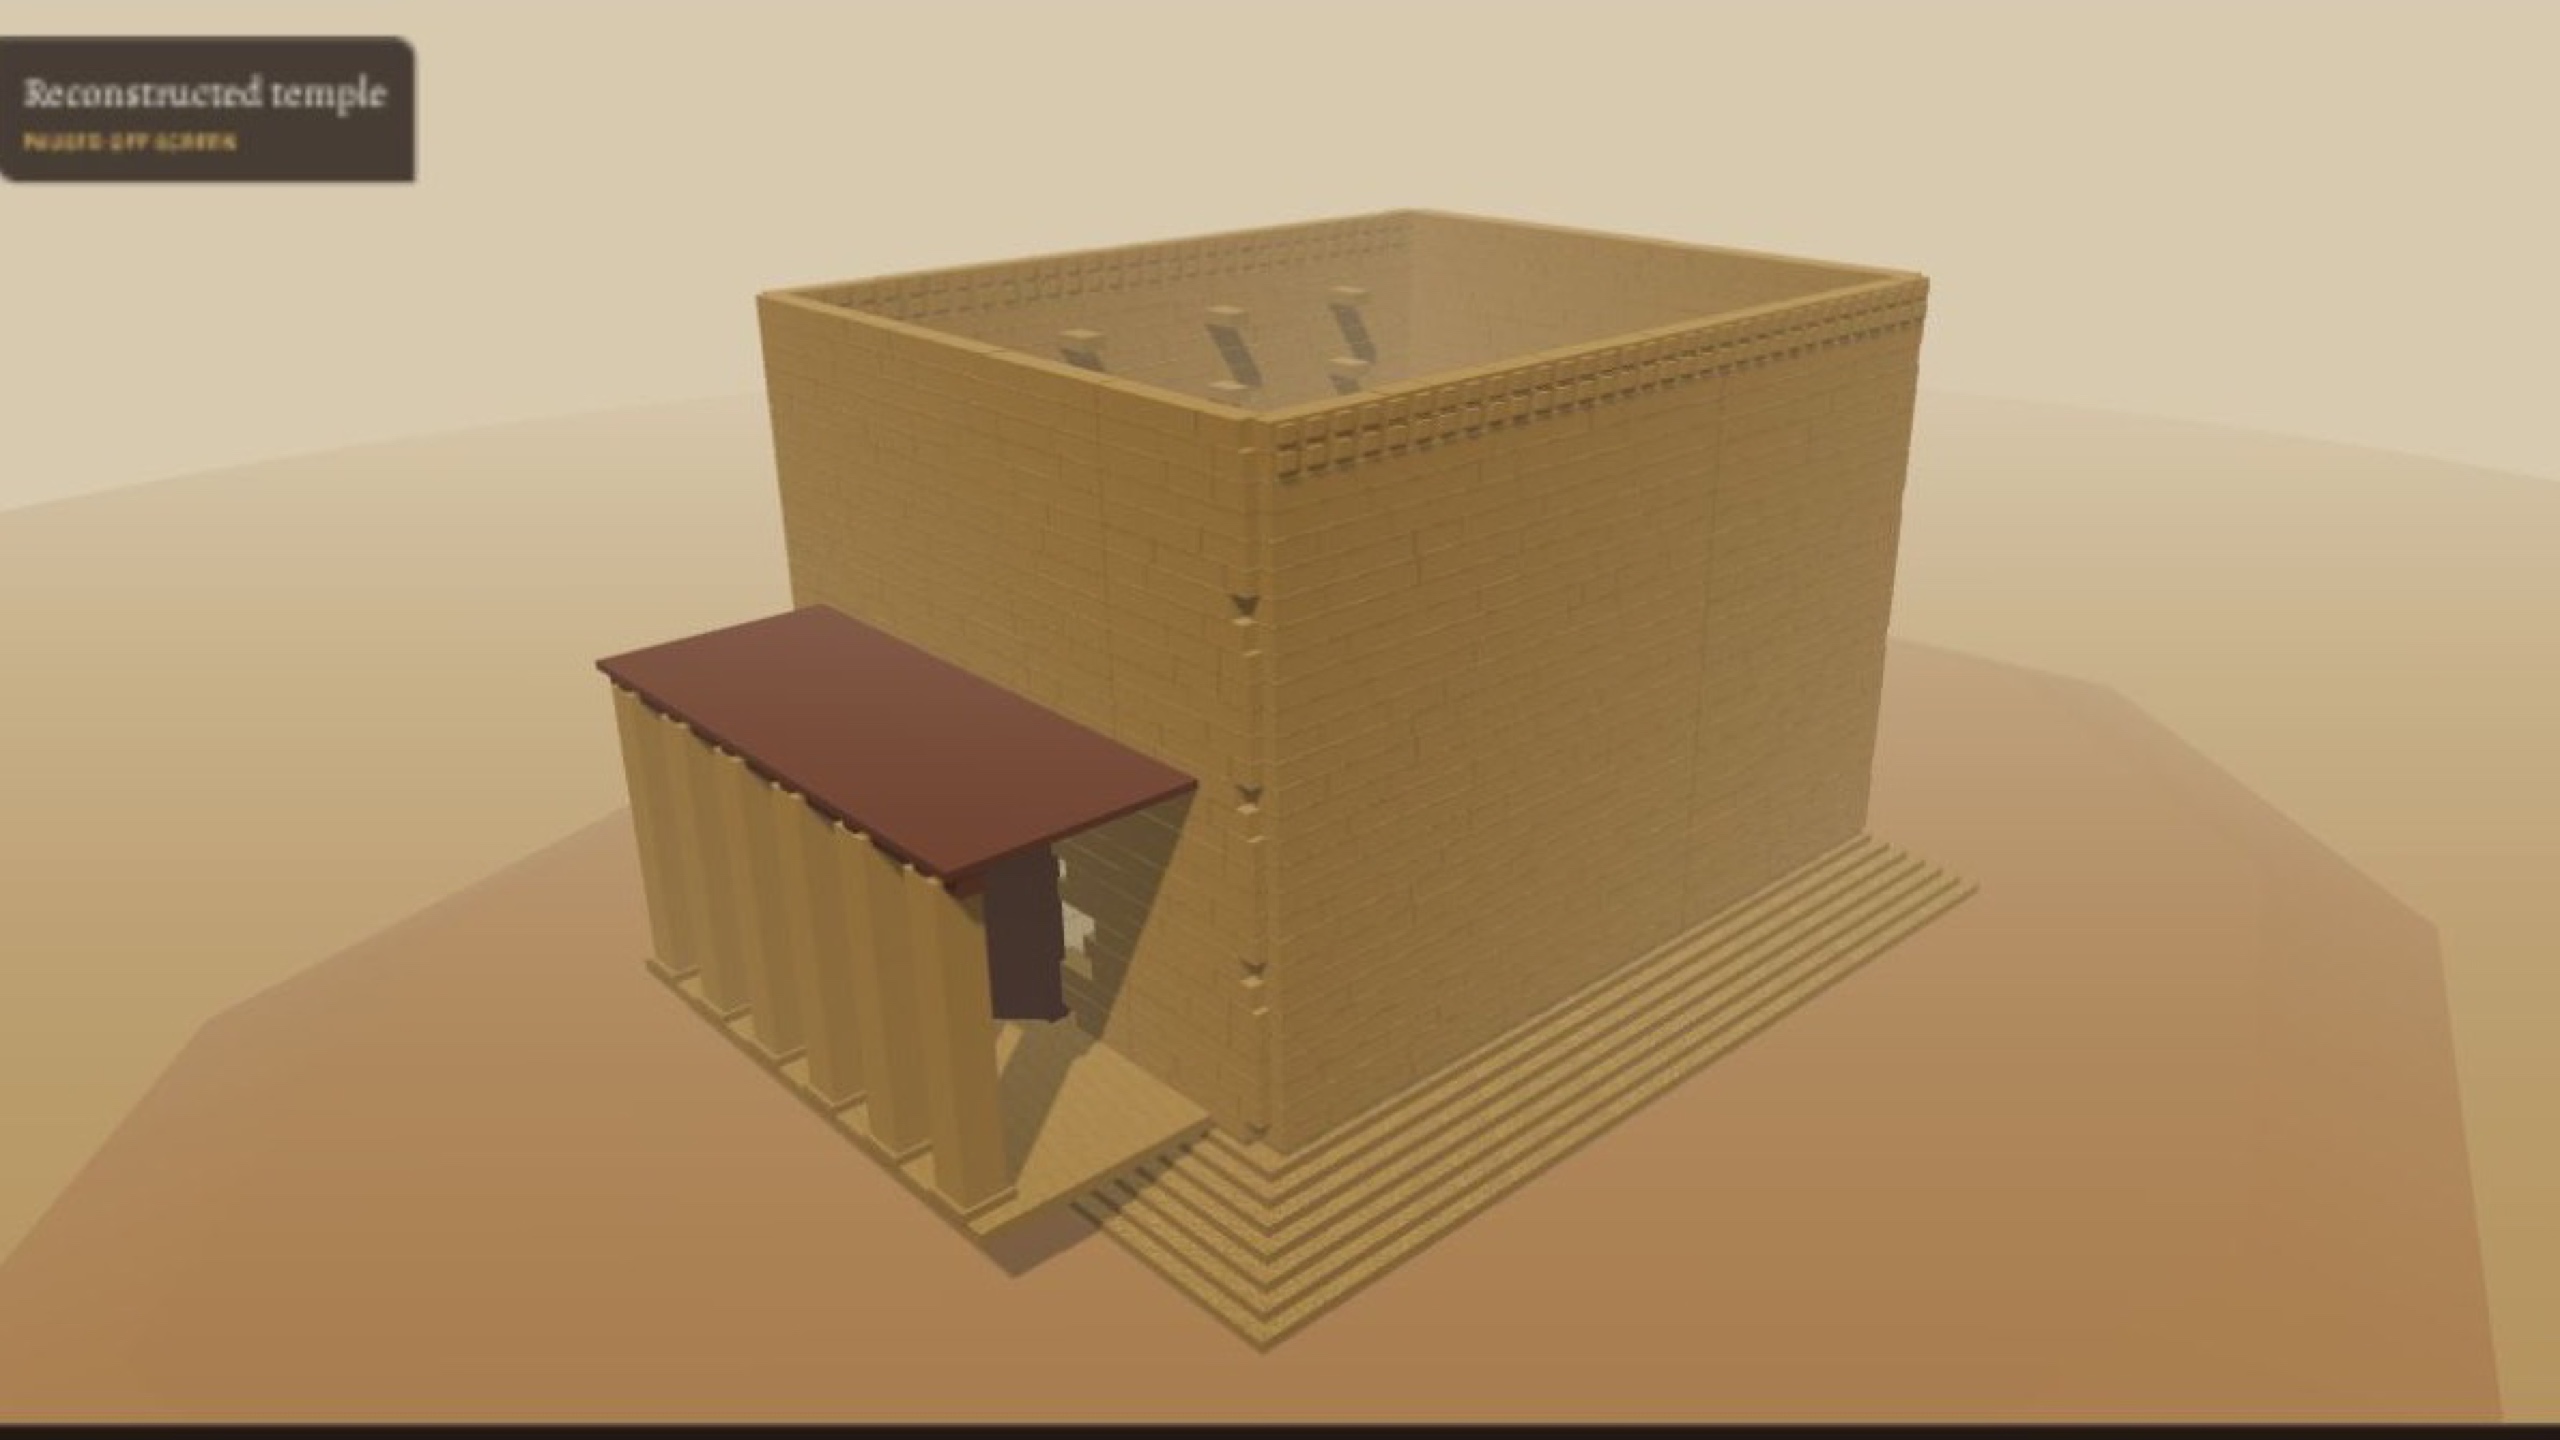
Source-led digital reconstruction of the Great Temple of Yeha from the west

Yeha · northern Ethiopian highlands

Reconstructing
the Great Temple

Seventh century BCE · source-led interpretation

A temple 18.6 metres long, 15 metres wide and represented at 13 metres high. Its dry-laid limestone walls still preserve the plan from the six-pillar western porch to the three-room sanctuary at the east.

Research note · 01

A reconstruction that shows its evidence

What survives. The dry-laid limestone shell, dressed margins, parts of the denticular frieze, pillar seats, internal bases, mortises, paving, drains and later baptistery can still be read in the building.

What is reconstructed. The single row of six porch piers, timber doorway, hypostyle pillars, raised eastern hall, three sanctuary rooms, covered side aisles and open centre follow the excavated plan and later architectural studies.

What remains uncertain. The exact roof, upper-storey circulation, colours and cult furniture are not fixed facts. The altar is therefore shown as a translucent, removable comparison rather than an excavated original.

The reconstruction · 02

Enter the building

Orbit around the temple, follow a guided route, walk at ground level, separate the masonry shells, or assemble the building step by step. No heavy 3D code is loaded on the homepage.

Source-led digital reconstruction of the Great Temple of Yeha from the western approach

Interactive reconstruction

Walk through the evidence

Model geometry is generated from published dimensions; uncertain layers remain labelled and removable.
View without 3D

Plan and walkthrough · 03

The temple without the canvas

This plan and walkthrough contain the same architectural information as the interactive scene.

Interpretive plan based on Robin and de Maigret’s fig. 22. The piers are three deep by four across, creating five longitudinal aisles; the central eastern marker is a hypothetical altar.

Walk from west to east

  1. Climb the stepped podium. The wide base levels a building set directly over irregular tuff bedrock.
  2. Pass through the propylon. Six rectangular piers stand in one façade row on a 5.1-metre porch, tied back to the western wall by roof beams.
  3. Enter between double doors. The leaves open onto a deep stone threshold and the lower floor of the hypostyle hall.
  4. Read five aisles. Twelve square supports stand three deep by four across, leaving the widest nave on the entrance-to-sanctuary axis.
  5. Step towards the sanctuary. A transverse rise lifts the eastern third of the hall before three rear rooms reached by a central stepped entrance.
  6. Read the altar carefully. The small translucent altar makes a plausible cult focus visible, but its form is comparative and not claimed as an excavated original.
  7. Follow the water. Channels cross the floor and meet the outlet in the southern wall.

Building sequence · 04

How Yeha was built

  1. 01

    A · Observed

    Bedrock and stepped podium

    The cutaway follows the measured slope without inventing buried chambers. At least seven steps are reported at the western approach.

  2. 02

    A · Observed

    Outer and inner masonry shells

    The smooth margins and pecked centres are represented at architectural scale, not as a scan. Cutaway mode separates the two shells so their construction can be read. Shown as a source-based interpretation rather than a measured third shell everywhere.

  3. 03

    A · Observed

    Bond headers lock the shells

    The exploded view pulls representative headers out from the wall.

  4. 04

    B · Strongly reconstructed

    Western propylon, open doors and threshold

    The six seats form one monumental façade row on a porch projecting 5.1 metres west of the temple; the full pillars and roofing are reconstructed. The six rectangular piers stand in a single row and carry beams back to the western façade, following the surveyed reconstruction rather than a detached two-row colonnade. The mortises survive; the beam profiles do not. Two open timber leaves reveal the deep threshold passage; their precise joinery and decoration are unknown. A narrow, clearly paved passage now links the porch, open double doors and lower hall without inventing extra rooms.

  5. 05

    B · Strongly reconstructed

    Twelve pillars divide five aisles

    Eleven monolithic volcanic-stone bases survive; the missing P3 position is restored from the regular plan. The supports are arranged three deep by four across—not four deep by three—so the wider middle nave remains on the entrance-to-sanctuary axis. The step is preserved in the excavated plan and separates the lower entrance floor from the upper part of the hall. Its measured height and width are represented around the hall and sanctuary walls.

  6. 06

    B · Strongly reconstructed

    Eastern sanctuary and comparative altar

    A stepped central approach leads to the rear sanctuary, with a central sacrarium and flanking annexes placed from the wall mortises and fig. 22 plan. The preserved platform and steps are represented without filling it with invented cult objects. The three rooms now run east–west behind a cross-screen with individual openings, matching the excavated plan; infill and finish remain restrained reconstructions. No complete altar from this room survives. The translucent form is a removable comparison, not a claim that Yeha’s altar looked exactly like this.

  7. 07

    B · Strongly reconstructed

    Covered sides and proposed upper level

    Coverage is strongly reconstructed; the exact roof build-up is not preserved. Its circulation, façade treatment and complete appearance remain unknown. No temple roof survives; material, parapet and drainage details are hypotheses.

  8. 08

    B · Strongly reconstructed

    Open centre, paving and drainage

    Its rainwater channels support an open central area, though the exact roof edge is unknown. The sources disagree over sandstone panels and tuff paving; the model uses neutral stone. They are consistent with rain entering the central space; no ritual purpose is claimed. Its course is observed; the complete original outlet profile is reconstructed.

  9. 09

    A · Observed

    Dentils and the completed form

    The surviving pattern is extended cautiously around the reconstructed elevations.

Evidence ledger · 05

Observed, reconstructed, uncertain

A

Observed

Survives at Yeha, has been measured, or is directly recorded in archaeological remains.

B

Strongly reconstructed

Supported by bases, sockets, mortises, burn traces, drainage, or repeated architectural study.

C

Hypothetical

Plausible, but its complete form is not securely established by the surviving fabric.

ATuff bedrock

The temple stands on an irregular natural tuff surface that lies close below the western paving and falls towards the east.

Dimensions: Natural surface; local fall represented schematically

Status: extant. Sources: DiBlasi 2003; Japp et al. 2011.

AStepped podium

A broad stepped base levels the rectangular temple above the irregular rock.

Dimensions: At least seven steps

Status: extant. Sources: DiBlasi 2003.

ALimestone ashlar walls

Finely dressed limestone blocks were laid without mortar in precise horizontal courses.

Dimensions: c. 18.5–18.7 × 15–15.2 m; blocks up to c. 3 m reported

Status: extant. Sources: Japp et al. 2011; DiBlasi 2003; UNESCO Tentative List 2020.

ADouble wall shells

Parallel inner and outer faces form the north, south and west walls.

Dimensions: c. 1.20–1.24 m total thickness

Status: extant. Sources: DiBlasi 2003; Japp et al. 2011.

BThicker eastern wall

The east wall may use an additional row or wider blocks where the ground falls away.

Dimensions: Thicker than c. 1.20–1.24 m side walls

Status: reconstructed. Sources: DiBlasi 2003.

ABond headers

Perpendicular stones connect the masonry shells at intervals and lock the wall together.

Status: extant. Sources: DiBlasi 2003; Japp et al. 2011.

APropylon foundations and pillar seats

Rock-cut seats and excavated foundations mark a monumental porch west of the entrance.

Dimensions: Six seats in one row; porch projects 5.1 m

Status: extant. Sources: Robin and de Maigret 1998; Lindstaedt et al. 2011; Japp et al. 2011.

BSix-pillar western propylon

Six rectangular pillars carry a roofed entrance porch reconstructed from the surviving seats and building analysis.

Dimensions: Six rectangular piers; porch depth 5.1 m

Status: reconstructed. Sources: Robin and de Maigret 1998; Lindstaedt et al. 2011; Japp et al. 2011.

BBroad timber entrance frame

Mortises around the damaged western doorway indicate a substantial frame, probably timber secured to the stone.

Status: reconstructed. Sources: DiBlasi 2003; Japp et al. 2011.

BProbable double doors

The doorway is reconstructed with two leaves meeting at the centre.

Status: reconstructed. Sources: Robin and de Maigret 1998; Japp et al. 2011.

ADeep entrance threshold

The western doorway passes through the thick ashlar wall between an outer fore-threshold and the lower hypostyle floor.

Dimensions: Passage through c. 1.22 m wall thickness

Status: extant. Sources: Robin and de Maigret 1998; DiBlasi 2003.

ATwelve internal pillar bases

Four rows across the hall, each three supports deep, divide the hypostyle room into five longitudinal aisles.

Dimensions: 12 positions; surviving sockets c. 0.73 × 0.65 m

Status: extant. Sources: Robin and de Maigret 1998; DiBlasi 2003; Japp et al. 2011.

BReconstructed hypostyle pillars

Rectangular pillars rise above the twelve bases to carry the upper floor or roof structure.

Dimensions: Lower hall pillars c. 6.3 m; raised eastern row c. 6 m

Status: reconstructed. Sources: Robin and de Maigret 1998; Japp et al. 2011.

ARaised eastern third of the hall

A transverse stone step raises the eastern third of the hypostyle hall before the sanctuary suite.

Dimensions: Rise c. 0.25 m

Status: extant. Sources: Robin and de Maigret 1998.

APerimeter stone bench

A dressed bench runs along the foot of the internal walls and steps around the western entrance.

Dimensions: c. 0.45 m high × 0.40 m wide

Status: extant. Sources: Robin and de Maigret 1998.

BOpen central aisle

The principal reconstruction leaves the central longitudinal space open to the sky.

Dimensions: c. 3.15 m wide in the assessment

Status: reconstructed. Sources: DiBlasi 2003; Japp et al. 2011.

BCovered side aisles

The two aisles on either side of the centre were covered and supported by the internal pillar system.

Status: reconstructed. Sources: Japp et al. 2011; DiBlasi 2003.

BUpper level over side aisles

Wall composition supports an upper level above the side aisles.

Status: reconstructed. Sources: Japp et al. 2011.

CComplete roof assembly

A restrained flat covering is offered as a translucent study layer.

Status: hypothetical. Sources: DiBlasi 2003; Japp et al. 2011.

BThree eastern rooms

The east end was divided into three approximately equal chambers.

Status: reconstructed. Sources: Robin and de Maigret 1998; Japp et al. 2011; DiBlasi 2003.

ARaised eastern platform

The eastern chambers stood on a low platform approached by dressed stone steps.

Dimensions: c. 0.15 m above adjacent supports; three steps reported

Status: extant. Sources: DiBlasi 2003.

BTimber-framed partitions

Wall mortises and fire traces support high timber-framed divisions at the east end.

Dimensions: Mortises c. 0.29 × 0.29 m; walls at least c. 6 m high in assessment

Status: reconstructed. Sources: Robin and de Maigret 1998; DiBlasi 2003; Japp et al. 2011.

CComparative libation altar

A modest stepped libation altar is placed in the central sanctuary to show a plausible cult focus, informed by the Almaqah altar at Meqaber Gaʿewa.

Status: hypothetical. Sources: Wolf, Nowotnick and Büchner 2015; Japp et al. 2011; Robin and de Maigret 1998.

AStone paving

Square and rectangular panels form a level floor above the sloping bedrock.

Status: extant. Sources: Japp et al. 2011; DiBlasi 2003; UNESCO Tentative List 2020.

AInterior drainage channels

Two channels join near the south side and carry water towards the wall outlet.

Status: extant. Sources: Robin and de Maigret 1998; DiBlasi 2003; Japp et al. 2011.

ASouthern drain outlet

A carved conduit passes through the south wall, now within a damaged area.

Status: extant. Sources: Robin and de Maigret 1998; DiBlasi 2003; Japp et al. 2011.

ADouble denticular frieze

Two rows of stone dentils survive near the tops of the north, south and east façades.

Status: extant. Sources: Japp et al. 2011; DiBlasi 2003.

ALater Christian baptistery

A circular baptismal installation was inserted in the south-eastern area during later Christian use.

Status: later. Sources: DiBlasi 2003; Japp et al. 2011; UNESCO Tentative List 2020.

CPossible ibex-frieze placement

Carved ibex fragments survive in the nearby church, but their original architectural position is uncertain.

Status: hypothetical. Sources: Japp et al. 2011; DiBlasi 2003.

CHighland setting

A restrained elevated basin and distant mountain horizon provide orientation.

Status: hypothetical. Sources: UNESCO Tentative List 2020; DAI Yeha research overview.

Sources and limits · 06

Where the reconstruction comes from

Published values do not always agree. The model uses explicit working values while preserving the range and disagreement below.

External dimensions
  • c. 18.70 × 15.20 mDiBlasi 2003
  • 18.5 × 15 mUNESCO Tentative List 2020
  • c. 18 × 15 mLindstaedt et al. 2011

The model uses 18.6 × 15.0 m; measurements preserve the published 18.5–18.7 × 15–15.2 m range.

Preserved or original height
  • Walls may originally have been c. 13 mDiBlasi 2003
  • Survives to a maximum of 14 mUNESCO Tentative List 2020
  • Original height more than 14 mLindstaedt et al. 2011

The interpretive model uses the requested 13 m working height and labels the published c. 13–more-than-14 m disagreement.

Temple wall material
  • Existing article previously called the walls sandstoneHabesha History Yeha article
  • Finely dressed limestone ashlarJapp et al. 2011
  • Petrographic sample: micritic limestoneDiBlasi 2003

The feature and article use limestone for the temple walls; sandstone remains associated with other Yeha elements, not these wall blocks.

Floor material
  • Sandstone panelsJapp et al. 2011
  • Tuff pavingDiBlasi 2003
  • Five layers of dressed stonesUNESCO Tentative List 2020

The model uses neutral paving and the interface preserves the disagreement instead of selecting an unsupported colour or geology.

Wall thickness
  • c. 1.20–1.24 m for north, south and westDiBlasi 2003
  • about 60 cm in a less precise summaryUNESCO Tentative List 2020

The model follows the measured 1.20–1.24 m double-shell assessment and identifies the east wall as potentially thicker.

Roof, upper level and drainage
  • Open central aisle with covered side aisles and upper levelJapp et al. 2011
  • Possible central compluvium; roof material and form unknownDiBlasi 2003

The open centre and side coverage are strong reconstructions; complete roof, parapets and circulation are a separate translucent hypothetical layer.

Ibex-frieze placement
  • Fragments reused in the church and attributed to the templeDiBlasi 2003
  • Could have come from another sacred building or interior decorationJapp et al. 2011

Not attached to the default reconstruction. Available only as a labelled hypothetical study layer.

Altar, statue, furniture and ritual staging
  • No surviving object securely establishes their complete appearanceJapp et al. 2011
  • A complete libation altar survives at the related Almaqah temple of Meqaber Gaʿewa, not in this room at YehaWolf, Nowotnick and Büchner 2015
  • Crypt was emptied and left no artefacts identifying its functionDiBlasi 2003

A small translucent comparative altar is shown in the central sanctuary and labelled hypothetical. Its exact form is not attributed to the excavated temple; no statue, furniture, offerings, priests or ritual scene is modelled.

  1. Christian Julien Robin and Alessandro de Maigret, “Le Grand Temple de Yéha (Tigray, Éthiopie), après la première campagne de fouilles de la Mission française (1998),” Comptes rendus des séances de l’Académie des Inscriptions et Belles-Lettres 142, no. 3 (1998), pp. 737–798, especially fig. 22 and pp. 752–756.

    Open source Openly readable through Persée; plans and text are cited as research.
  2. Sarah Japp, Iris Gerlach, Holger Hitgen and Mike Schnelle, “Yeha and Hawelti: cultural contacts between Sabaʾ and DʿMT — New research by the German Archaeological Institute in Ethiopia,” Proceedings of the Seminar for Arabian Studies 41 (2011), pp. 145–160.

    Print sourceCopyright Archaeopress; cited as research. No figures redistributed.
  3. Pawel Wolf, Ulrike Nowotnick and Saskia Büchner, The Almaqah Temple of Wuqro in Tigrai/Ethiopia (Berlin: Society for the Promotion of Museums in Ethiopia, 2015), especially pp. 21–25.

    Open source Author-uploaded research cited for the comparative libation altar; no source figure is redistributed.
  4. Michael DiBlasi, A Needs Assessment for the Restoration and Maintenance of the Yeha Temple (Boston University African Studies Center, 2003).

    Open source Cited as research; report imagery is not redistributed.
  5. Maren Lindstaedt, Klaus Mechelke, Mike Schnelle and Thomas Kersten, “Virtual Reconstruction of the Almaqah Temple of Yeha in Ethiopia by Terrestrial Laser Scanning,” ISPRS Archives XXXVIII-5/W16 (2011), pp. 199–203.

    Open source CC BY 3.0
  6. Ministry of Culture and Tourism of Ethiopia, “The Cultural Heritage of Yeha,” UNESCO World Heritage Tentative List, ref. 6477 (submitted 10 March 2020).

    Open source Text cited and paraphrased; no UNESCO imagery redistributed.
  7. German Archaeological Institute, “Archaeological Research in Yeha,” TransArea Network Africa.

    Open source Cited as research; DAI photographs and reconstructions are not redistributed.

Continue the history

Read the complete Yeha article

Continue beyond the temple to the wider settlement, palace, tombs, inscriptions and Yeha’s place in the early northern Horn.

Read Yeha Return to the site record